Game of Thrones: R32 Part 2 - Nismo Seat Cover DIYATNTFIU, Front Seats
Okay, so you've decided you can't live
without Nismo's snazzy logo adorning your R32's seats and you've
thrown down the shekels for a full set of their seat covers. Well,
congratulations! Assuming you're doing it yourself you've now
committed yourself to a process that will involve enough frustration
and anger to make you vow to see the designers of these seat covers crushed,
driven before you, and hear the lamentations of their women.
You may even punch your seats a few
times – I know I did.
Anyway, lemme see if I can help you
avoid that.
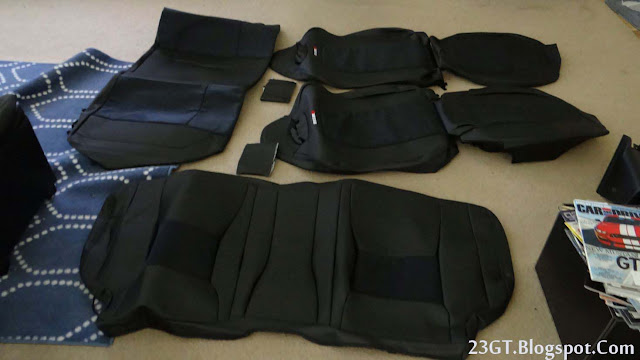
First, let's open up that big box and
see what you get:
 |
| More fake black leather than a dominatrix's basement. |
Yes, it's a sea of black faux leather
but oh what's this? An instruction manual! Unfortunately it's all in
Japanese but at least thankfully it's like Penthouse - saved by
having pictures. There are also a pair of metal hooks. We'll get to
those later. Oh, and in addition, you get your official Nismo Pokey
StickTM ! Don't lose it, you're gonna need it. Boy will
you ever need it.
 |
| See that thing on the right? You'll be the envy of every other Nissan fan with your official Nismo Pokey StickTM! |
What tools do you need? Not much but
here's a list:
- A Philips screwdriver
- A plastic panel popper with a y-shaped end for prying out trim clips
- Your official Nismo Pokey StickTM that came with the set, we'll call it the NPS for short
- A rubber mallet (who would have thought you'd need a hammer to install seat covers?)
- The patience of Mother Teresa
So, first things first, go to my seat removal DIY and get your seats out of your car. You won't be getting
very far in this process without doing that to start with.
Once you have your seats out it's time
to get down and dirty. Let's start with one of the front seats.
First, you should preferably find an area to work in where you can
get down on the floor and adopt different positions comfortably. No,
the bed isn't a good choice – we're not talking about those kinds
of positions. Might as well grab a small stool too to make
some portions easier as well. If you can plop the seat onto a table that's fine too but you'll be doing a lot of pushing and tugging so make sure you've got enough room and the table's sturdy enough.
 |
| Start with one old seat. |
Okay, let's start by putting the bottom
portion on first. Start by undoing the screws holding the plastic
side covers.
 |
| On the side of the adjustment levers there are three screws to undo - one here... |
 |
| ...the other here on the front... |
 |
| ...and one on the back. Apologies for the poor pic but it's there where the circle is. |
The manual tells you to just undo the
screws but here's my first tip make it easier for you: take off the
cover on the seatbelt side entirely. It's easy to do and gives you
more room to work with. The opposite side panel with the adjustment
levers is much more involved to remove so don't bother and just take
off the screws to loosen it.
 |
| Start by unbolting the seatbelt receptacle and removing the wiring. The wire is clipped to the plastic and there's a ziptie on the bottom of the seat. |
 |
| Then undo the screw on the back beside the backrest (on the right side of this picture). |
 |
| Lastly, pop off the trim clip and the panel should come off easily. |
With the covers loosened and/or
removed, get the cover in place. The covers aren't marked to tell
which goes on the driver or passenger sides, at least not in English,
but you can easily tell you have the right one by just making sure
the side with the long plastic U-shaped clip is on the seatbelt side
of the seat you're working on.
 |
| To make sure you have the correct cover for the seat this u-shaped plastic clip should be on the seatbelt side. |
Slip the front portion into place and
then you'll need to shove the rear end into the gap between the two
halves of the seat. Shove it in from the front first then pull it
into position from the back. Use your NPS to help feed the cover
through the gap.
 |
| Slide the cover on from the front then start shoving the rear end into the gap between the bottom of the seat and the backrest. |
As you get the rear end of the cover in
place you'll want to shove the rear corners into place. Use the NPS
to help.
 |
| You'll need to shove these corners into the gaps. Use your NPS liberally. |
 |
| Here's one corner in place. |
The rear corners have a strap on each
side that you'll need to feed into the gap in the seat rails. See,
this is why I told you pick a comfy place you can lie down in because
there's not a lot of space there for the straps to go through. Your
frustration will likely begin to mount here.
 |
| There's not a lot of space to feed the straps in between the sliders and seat. Some long-nose pliers or forceps can be handy. |
 |
| The rear of the cover should look like this once it's all in place. |
Once you've jockeyed the rear end into
place start strapping it down. Do the side strap first then the two
that run forward and back. Feed the straps into the buckles like in
my picture below.
 |
| You'll be doing up a lot of these straps before you're done. |
 |
| Here's all the straps in place. |
Once you've tightened up the straps
tuck the sides into place. The adjustment lever side is easy – you
just have to tuck the hem underneath the panel, return the screws you
removed earlier except for the one at the rear and you're done.
 |
| Make sure you tuck the hem of the cover under the panel. |
The opposite side is where the next
area of frustration begins. There's a U-shaped clip stitched onto the
cover that you'll need to fold over 180 degrees and then try to clip
onto the round metal rail on the side of the seat. There's very
little room to fit that clip so don't be surprised if it takes
several tries. You'll probably have to push REALLY hard to get the
clip to seat. A few raps with the mallet can help get it attached
once you can get it into position.
 |
| The clip should fit like this once you're done. Getting it to this point is a pain in the arse though. |
After doing that step you can reinstall
the plastic side cover you removed earlier but don't put the screw on
the back in yet because you'll need to keep the panel loose for the
backrest cover to fit properly.
Now it's time to
tackle the cover for the backrest. Before you put that on though it's
time for another tip: remove the plastic hoops from the harness hole
first, cover them, then put them back before you put the backrest
cover on. The manual will tell you to wait until you've put the cover
on before returning the harness hoops but that just makes it harder
to see what you're doing when putting them back in.
To remove the hoop, first use your
panel popper to pry off the four push fasteners holding it in. There
are two on top and two on the bottom. Save them to reuse later.
 |
| You can see the bottom push fasteners here. Yank them off with the trim tool but be careful - they can be brittle so make sure you position the tool correctly before levering them out. |
Once you remove the push fasteners
you'll now need to grab the hoop and pull with all your might to get
it out from the back. It's packed in there tightly so it'll take some
effort. It's definitely not as easy as the picture in the manual
makes it look.
 |
| Here's what it looks like without the hoop in. |
When you get the hoop out the manual
wants you to wrap them in the little round vinyl pieces that have
adhesive on the back. Here's another tip for you – if you want them
to look good save yourself a lot of irritation and take it to an
upholsterer to have them put the vinyl on. The pieces Nismo gives you
are undersize and take a lot of stretching to get to fit snugly. Even
if you can get them on the adhesive alone isn't the most secure
method to attach the vinyl especially since you have to shove them
back in the holes. I paid an upholsterer 50 bucks to do it for me and
he got the vinyl snug and stapled it so it won't ever come off. My
sanity is worth a lot more than 50 bucks and yours is probably as
well.
 |
| The manual tells you to do this and stick the material on with the adhesive backing. Good luck with that if you're not an experienced upholsterer. |
 |
| An experienced upholsterer will get them to look like this - snugly fit and secured with lots of staples. |
Once you have the hoops covered, for a
thorough job you should cut out the holes for the push fasteners and
then shove the hoops back into the holes. The hoops fit very snugly so
you could conceivably skip reusing the fasteners but I wanted a
proper OEM look so I put them in mine. The hoops can take a lot of
shoving to get back into proper place so make like MC Hammer and
break out your mallet again if the bastard's proving tough.
 |
| Back in place and looking like a factory job. |
With the hoop back in place it's time
to put the backrest cover on. Slide the cover onto the backrest and
then you'll need to shove the bottom end between the backrest and the
bottom cushion in order to wrap it around and secure it with velcro
to the back of the cover. Before you go to that effort just make sure
you check the sides are lining up properly with the plastic covers on
each side. Use the NPS again to help shove the cover in the gaps.
 |
| Slide the cover on and then start getting it snug. |
Once you get the cover snug you can
close the two side zippers and secure the velcro ends. You can also
replace the screws for the two plastic panels on each side now after
making sure the cover is tucked underneath them properly.
 |
| The zippers should close without much effort if everything's in place. |
Next you'll need to secure the loose
flaps of material around the harness hole. Grab your NPS again firmly
and start shoving the loose ends into the gap between the hoop and
the backrest. This is the last tedious step you'll need to do.
 |
| The better way to do it is like this - the hoop is in place already and you shove the loose material into the gap with your NPS. |
After that, stare at the wonder you
have wrought! Isn't that seat much nicer to look at now? Have a beer
or ice cream or something to congratulate yourself on surviving such
a tedious job. Following that you may want to have a good cry when
you realize you have to go through it all over again for the other
seat.
 |
| The newly-covered seat looks much better than the original drab gray dontyathink? |
Next time I'll continue by discussing
how to do the rear seats – which is a much less maddening task
thankfully.
Important
disclaimer: Understand that working on your car can be inherently
dangerous. This is meant to be a guide only and does not take the
place of common sense and proper safety precautions. Only you can
ensure your own safety. Know your limits and ask for qualified help
if you're unsure of something. Every time you act stupid in the
garage...God kills a Miata.


Wow, thank you for doing this, Nismo 167 used to belong to me, I'm glad to see its being fixed and babied.
ReplyDeleterriggi129@hotmail.com
Send me tons of photos please, you dont know how much I miss this car ahahah
Thanks for leaving a comment. It's been nice chatting with you by email and learning about what the story to this car was before.
ReplyDelete