DIY-ATNTFIU: R32 Interior Removal Part 2 - Dashing Through The...Snow?
Okay, continuing on from my last post on interior removal, we'll tackle something that many of you will
probably contemplate doing – removing the dash. The R32 dashboard
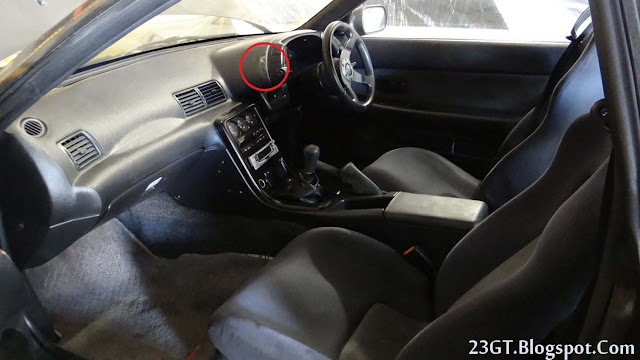
is notorious for getting bubbles in the vinyl, and if you're even
more unlucky it's also prone to previous owners haphazardly drilling
holes in it to attach extra gauges and Hawaiian dancing girl figures.
 |
| My dash suffered from both a big bubble and holes drilled in it for a gauge where the red circle is. |
The good news is that after removing my
dash I solved both issues and rehabbed my dash to look better than
new which I'll talk about in a later post.
There's already a very good DIY posted
online about removing the dash and center console. Rather than trying
to simply duplicate it I'm going to link to it here and then add some
tips to clear up some stuff that wasn't discussed in detail in that
guide.
That guide is very detailed and well
illustrated but there are some sections that are glossed over a bit
so let me try and help you out with those. Since my car's interior
isn't all back together yet I can't offer you better pics for now
anyway than what's in that guide.
First, let me tell you the tools you
need:
- Socket wrench set (A 10mm socket is all you really need except for the steering column that needs a 12)
- Long extension bar for the socket wrench and/or a very long phillips screwdriver (at least a foot long) for the upper dash bolts
- Preferably also have a regular-sized phillips screwdriver for the other screws since a long one would be unwieldy
- Plastic panel poppers
- A second person to help when removing the main dash assembly. It's possible to lift it by yourself but it's very unwieldy and there's wiring you have to detach that's simply easier to do with another person helping.
- A candy bar, 'cause this'll take a while and you might get hungry. Be nice and have one for your friend too.
Okay, so in the guide he starts off
with the A-pillar trim, kick panels, and door sills removed already
so let me discuss those in case you need help. The A-pillar trim is
easy, they're just held in by clips on the back so you just carefully
pry them out with your panel poppers and pull them off, starting at
the rear portion.
 |
| A bunch of simple clips on the back are all that hold the A-pillar trim in place. |
The kick panels are also easy since
they're just held in by two screws each.
 |
| The red circles highlight the screw holes. |
The door sills should also be easy but
can be a pain in the ass if anyone has messed with them before.
They're each held in by five plastic retainers and the screws for
those retainers can strip very easily. If someone has been ham-fisted
with yours, pry up the door sill gently with a panel popper and that
may give you enough traction to undo the screw or alternatively you
can try to pry out the screw by jamming a small flathead screwdriver
under the edge.
 |
| At the bottom of the picture you can see the plastic door sill piece. The five plastic screws easily strip. |
The inner weatherstrip lining the door
doesn't need to be removed to take out the dash but if you need to
for some other reason like repainting or if they're worn with age,
they just pull off.
 Another section that isn't detailed in
the guide is the process of removing the center console bezel and the
stereo, gauges, and AC module. In that guide he's working on a GTS-T
without the triple gauges but the principle is the same. There are a
bunch of connectors you have to undo and you have to be careful with
some of them like with the cigarette lighter socket and the
temperature sensor that's screwed on to the bezel. If you yank the
bezel off haphazardly you can damage those connectors and it'll be
time to break out the old wallet and buy replacements. This guide
from SAU I've linked below covers the missing areas for the center console and it also
mentions how the factory shift knob just unscrews off since he didn't
remove his aftermarket knob in the first guide.
Once you get to the final two bolts on
the top of the dash, those are hidden under a little plastic panel on
the driver's side and by the sunload sensor on the passenger's. Those
just come off easily with a panel popper. In the guide he uses a long
socket extension to remove the bolts. You can also use a long
phillips screwdriver but it's safer to use a socket when undoing the
bolt. When reinstalling the dash, you may find it easier though to
use the screwdriver to first tighten the bolt since you might need
some pushing to get the dash back in proper position. With the
screwdriver you can use one hand to keep the dash in the right
position while the other holds the tool and tightens the bolt.
And just as a general tip, when doing
something like this where you're removing something held in by a
multitude of bolts and connectors, make sure to photo document the
steps for future reference in case you forget where something goes.
It's also helpful to keep the screws and bolt organized in plastic
bags or trays labeled with the places where they go.
As a parting shot and teaser for a
future post on my own dash renewal efforts, here's a pic of my own dash you can compare to the before image I posted at the start of the article to show you the nice new look it has. Come
back in the future to see how this was achieved.
So, that concludes this part on
removing the dash. Yeah, it's a ton of work. If you feel like doing
more and want to turn your R32's interior into a bare shell with all
the amenities of a cardboard box then stay tuned for the next part
where I'll talk about removing the carpet and the rear portion of the
interior.
Important
disclaimer: Understand that working on your car can be inherently
dangerous. This is meant to be a guide only and does not take the
place of common sense and proper safety precautions. Only you can
ensure your own safety. Know your limits and ask for qualified help
if you're unsure of something. Every time you act stupid in the
garage...God kills a Miata.


Comments
Post a Comment