Game of Thrones: R32 Part 3 - Nismo Seat Cover DIYATNTFIU, Back Seats
You've survived the hellish ordeal of
fitting the Nismo seat covers on the front seat, and now you're
feeling up to finishing your labors by tackling the rear seat. Well,
good news, the rear seats are nowhere near as hard. While the front
seats can feel as labor intensive as Hercules cleaning the Augean
Stables, the rear seat will be like scrubbing down your bathroom
toilet bowl by comparison – still not particularly fun but much,
much easier.
 |
| The goal is to have your back seats looking like this |
Before you begin, let me start off with
a tip – inspect the metal frames of your backseat. Chances are good
that 25 years of humidity and neglect have introduced the brown
menace to your seat frames. No, not diarrhea bro, I'm talking about
rust! Those seats didn't have the greatest rust protection so if your
car's anything like mine the frame will have a nice patina of surface
rust. Since you have the seats out anyway you might as well do some
preventive maintenance. Take a steel brush and scrub the worst of it
off and then apply a rust converting paint like Loctite Extend on the
frame. After you're done the metal will be a much nicer looking shade of
black and will hopefully weather the next 25 years better.
 |
| This is handy stuff especially when you're restoring an old Skyline. Image credit: Loctite |
 |
| Slather it onto your seat frames and they magically go from ugly brown to fashionable black. |
Okay, once the paint's dried it's time
to tackle the covers. One indication of how much easier this is going
to be is that you'll only need one tool this time – your official
Nismo Pokey StickTM. You'll probably need a couple of
small bungee cords too but I'll get to that later.
Following the same order as the manual,
we'll do the bottom half of the rear seat first. Start by slipping
the two metal hoops on the back of the seat cushion into the
corresponding holes in the cover.
 |
| Yup, just stuff that long hard thing in that hole. Just to see how it feels. |
Once you have those in place wrap the
edges of the cover around the cushion until everything is snug.
 |
| This is easy compared to the front seats. |
After doing that, flip the cushion over
and start fastening the straps just like you did with the ones on the
front seats.
 |
| Get the straps all nice and snug. |
When the straps are all snug grab the
two ends of the drawstring that runs around the hem of the seat cover
and pull them tight. Knot the ends together once you've got the cover
drawn up fully. After tying mine I put a ziptie around the knot for
added insurance.
 |
| Now all that's left is to grab those two strings and knot them up. Aren't you glad this was so easy? |
And...you're done! Holy shit that was
easy.
Now on to the backrest. This one's
going to be slightly trickier but not by much. First step is similar
to the bottom cushion. Slip the two metal hoops on the lower edge of
the backrest through the holes in the cover like you did with the
bottom cushion.
 |
| More holes to fill with long hard things. |

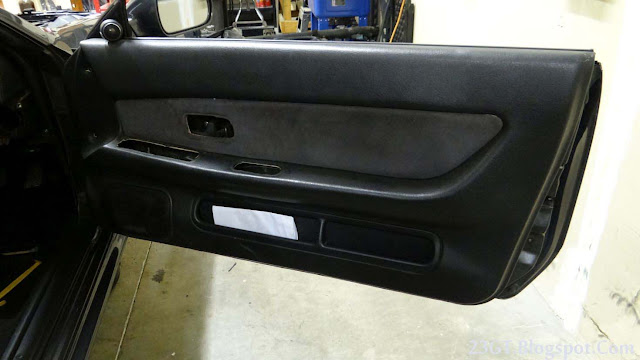
Next pull the edges of the cover around
the backrest until they're all wrapped around.
Once the cover is wrapped around the
backrest do up the four vertical straps and buckle them up like you
did with the other pieces. Thread them underneath the metal rails
instead of over them so that they don't chafe or snag on anything
once it comes time to reinstall the seats.
 |
| Make sure to run the straps under the seat frame. |
 |
| Get them snug then go on to the next step. |
With the four vertical straps in place
it's time to do the four straps on the top corners. They simply wrap
around the metal frame like in the picture below and get secured with
velcro.
 |
| Velcro is awesome. |
Now comes the one tricky part of the
back seat covers. You'll find two elastic bands on the bottom corners
of the cover. Remember those two small metal S-hooks included with
the instructions and your NPS? The instructions say you're supposed
to use the S-hooks to clip the two elastic bands to the metal frame.
Well, I don't know if it was just a defect on my set of covers or
they're all made improperly but the elastic on mine could only reach
halfway to the nearest frame rail. Ain't no way the S-hooks were
going to work without tearing the elastic right off the covers. So I
devised an easy solution, I had a pair of small bungee straps lying
around and I just used them to attach the elastic to the rails.
Simples!
 |
| Yeah, Mr. Seat Cover Designer Guy, halfway there doesn't work! |
 |
| Thank God for bungee cords. |
 |
| All done! |
Now that you've got all the covers on
it's time to throw them in the car. Just reverse the removal process
and your interior will be looking much spiffier than before.
 |
| The covers are loose when you first put them on so to get them to settle in I chucked some random books and magazines on top while I waited for a chance to put them back in the car. |
Oh, don't throw away your NPS after
installing the covers by the way. You'll need it for one final job
when you reinstall the back seat. The seatbelt receptacles have to be
pulled through the holes in the bottom cushion and then you'll have
to make sure the sleeves in the cover for them are snugly tucked into
the channels in the cushion.
 |
| You'll need your NPS to get these sleeves tucked away properly in the bottom cushion. |
Once you return all your freshly
covered seats your car will have gained oodles of extra Nismo –
guaranteed to attract the opposite sex 60% of the time every time!
Important
disclaimer: Understand that working on your car can be inherently
dangerous. This is meant to be a guide only and does not take the
place of common sense and proper safety precautions. Only you can
ensure your own safety. Know your limits and ask for qualified help
if you're unsure of something. Every time you act stupid in the
garage...God kills a Miata.
Comments
Post a Comment