DIY-ATNTFIU: Floor Plans - Replacing Carpet and Installing Sound Deadening In Your R32 Part 1
A while ago I talked about how you can strip out the 25-year old tanuki turd
infused carpet in your Skyline and now I'll explain how you can put
in fresh new carpet for North American mammals to desecrate instead.
You might be wondering right about now where you can get new
non-turd-laced carpet. Well, let me refresh your memory by giving you
this link to my previous post on getting parts for your R32. In it
you'll find that I mentioned a company from Australia that makes
R32-specific carpet in all the colors of the rainbow (Okay, I'm not
really sure they make it in indigo but you can always ask).
You could also put in replacement carpet from a wrecked R32 or one
that's going race car but then you'd just be swapping one set of
carpet that's old enough to get wasted and vote for another. Like
many other things such as cars, electronics, and our ability to
rapidly access the world's treasury of knowledge and random cat
videos, carpet materials have improved since the R32 was first made
so you're probably better off getting new stuff.
While you're waiting for your new floor coverings to arrive you might
as well get started with some preliminary work. Another thing that's
improved since the R32 was designed is the acoustics of car interiors
and that's partly thanks to new materials and methods such as the use
of sound deadening.
You may have seen this stuff on the internet and if you're an
audiophile you've probably even used it. Sound deadening is that
silver stuff people like to stick all over the interiors of their
cars so that YOU CAN TOTALLY FEEL THE BASS YO! The most common brand
you'll see is Dynamat but there are numerous others that go by the
names FatMat, Roadkill, and NoiseKiller24K YourNeighborsSuckAnyway
XL. I may have totally made up that last one.
 |
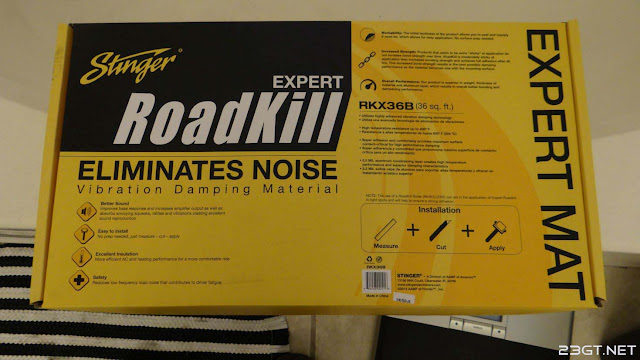
| I elected to use Stinger Roadkill in my car after doing my research. |
It's a common misconception that Dynamat and their ilk are sound
insulators but really they're not. Unlike insulators which try to
block sound from entering the car what sound deadeners do is dampen
the vibrations of panels they're attached to. Basically, Dynamat
increases the mass of a panel so that it vibrates less and therefore
makes and transmits less noise. Because it's just meant to dampen
vibrations experts say you really only need to cover 25-50% of a
panel to get decent results. Funny enough, the instructions for many
of these products tell you to cover everything in as much stuff as
possible. Of course, companies don't want you to buy more of their
material than you really need right? Yup, that never happens...
For my car I bought a box of Stinger Roadkill Expert from Amazon.
This was my first time putting sound deadening in a car so I
initially gravitated to the well-known Dynamat but reviews claimed
the Roadkill was just as good but much cheaper and they claimed it
didn't have the nasty asphalt smell that Dynamat and a lot of other
sound deadeners have (asphalt is the major component of most of these
products). If you're a faithful reader of my blog you'll recall I bombed my R32 with a Mequiar's Air Refresher a while back to
successfully banish the quarter-century oduer it had when I
first got it so I wasn't about to replace it with the smell of
freshly-laid tarmac.
Removing the carpet from your R32 removes something else, the jute
padding that's underneath. The jute acts as an insulator and
cushioning so nasty as it is after 25-years you'll want to replace it
with an equivalent. Putting in the Roadkill would take up some of the
space once occupied by the jute but it wouldn't nearly be enough to
replace it all and besides, the sound deadener is hard stuff and
wouldn't give the cushioning needed underneath the new carpet.
Knowing this I had also ordered a roll of closed-cell foam from
Amazon. This stuff would be the filling between the Roadkill and the
new carpet.
 |
| A roll of this stuff replaced the jute padding that got binned when the old carpet came out. |
One other thing I picked up from Amazon was a roller. This comes in
handy once you start applying the Roadkill and foam so that you can
get it to lay down as best as possible. Aside from the roller you'll
need a good pair of scissors (I used a set of trauma scissors I had
lying around) and a sharp box cutter.
Once you have all your tools and materials it's time to get to work.
Start by vacuuming the floor pan of your car. Be as thorough as
possible. After you get all the nastiness sucked up you'll then prep
the surfaces you'll be applying the sound deadener to by spraying
them down with some denatured alcohol and wiping with a rag. Sound
deadening is made to be very adhesive but of course you'll want as
clean a surface as possible to make sure it sticks well. The alcohol
removes any grease and oils that can affect adhesion.
 |
| Twenty-five years is plenty of time for dirt, dust, half-eaten sushi, renegade ninja clans, and everything else to find its way into the nooks and crannys of your floor pan. |
 |
| Vacuuming and a good wipe down with denatured alcohol gets rid of most of the crap to prep the floor for the new stuff going on top. The renegade ninjas may require more work. |
After prepping the surface start covering the floor pan with sections
of sound deadener that you've trimmed to fit. Be careful while
cutting the material. Sound deadening usually has a metal skin on the
side opposite from the sticky surface and you can easily cut yourself
on the foil edges if you're not paying attention. I got a small nick
but after that I avoided any further mishaps by just being careful.
Gloves can help if you've got the attention span of a drugged-up
shrew and the handicraft skills of Jeremy Clarkson.
 t t |
| The sound deadener has the bonus effect of making your old floorpan look fresher and shinier - not that you'll ever see it again once the new carpet goes on. |
 |
| Here's the middle of the driver side floorpan before... |
 |
| ...and after covering with the Roadkill. |
 |
| Same process on the passenger side... |
 |
| ...and everything looks better. |
You'll notice from the pictures that I covered practically all of the
floor pan with Roadkill but used substantially less in the rear seat
area. Sound deadener is heavy stuff – the box of Roadkill I had
weighed about 25 pounds. I put in more on the floorpan to fill up the
void left by the jute under the old carpet but on the rear seat area
I used much less to minimize the added weight. Like I mentioned
earlier, experts will tell you covering only about 25-50% of a
panel's area with sound deadener is usually more than enough so using
only a minimum on the other areas apart from the floorpan should
still give most of the benefit without too much added weight. On the
door panels as well I only stuck small pieces in and ended up using
only half of my box of Roadkill. This is a GT-R of course, not
granny's Buick, so keeping an eye on the weight only felt right.
 |
| The scale tells the tale - sound deadener weighs a bunch but I wanted to add a little bit more every day civility to my R32 so I figured a little bit of weight wouldn't hurt. |
After installing the Roadkill I started adding a layer of closed-cell
foam on top. The kind I got from Amazon is very light but soft and
self-adhesive. The most common type of closed-cell foam sold in audio
shops is much heavier and thicker. The heavier stuff gives better
sound insulation but you'll pay a weight penalty. I preferred to lean
towards weight savings versus better acoustics in my car hence my
choice of foam but you may prefer to go the other way if you prefer
to be better able to hear the dulcet tones of Babymetal...or
Bach...or Miike Snow...or Nat King Cole...or Alvin And The Chipmunks
if that's what floats your boat.
 |
| Here's some of the foam on the middle passenger-side floorpan. |
 |
| The foam I got had a self-adhesive backing. I traced shapes onto the back so that I could cut away only the parts I wanted to stick down and leave those flaps I mentioned earlier free to move. |
With the floor pan now prepped I'll wrap up part 1 here and then in
part 2 I'll talk about how to fit and install the new carpet. Be sure
to come back for that post – unless you have a strange aversion to
comfy floors.
Important
disclaimer: Understand that working on your car can be inherently
dangerous. This is meant to be a guide only and does not take the
place of common sense and proper safety precautions. Only you can
ensure your own safety. Know your limits and ask for qualified help
if you're unsure of something. Every time you act stupid in the
garage...God kills a Miata.


Comments
Post a Comment