DIY-ATNTFIU: Jacking up an R32 Skyline (or any other car for that matter)
This will be the first of what I call
DIY-ATNTFIU articles – short for Do It Yourself, And Try Not To F
It Up. I'll start off by letting you know that I don't claim to be an
amazing mechanic so you won't see me rebuilding an engine with just a swiss army knife and a popsicle stick but I am decently handy with a spanner...or a
drill...or a sonic screwdriver - and this is not the first DIY I've
ever written. A while ago I wrote a rather well-received forum post
on how to install aftermarket seats in an R35 GT-R – a more
complicated affair than it might seem since there are a bunch of
sensors, warning lights, and whatnot you have to bypass. Voodoo magic
and a couple of animal sacrifices were needed for success.
The fact that I'm not an expert
mechanic may actually help with these DIYs because I'm not going to
just pound you with technical terms that I assume you understand.
We're gonna keep it simple and assume you're new to wrenching on a
car but have a boundless desire to be closer to your vehicle (in a
healthy, platonic way) and learn more about it while hopefully not
losing too many skin cells in the process.
We'll start off with something simple
but daunting to someone who's never done it before: lifting a car and
getting it on jackstands. I know, to many of you this might seem too
easy a job to need a guide but we were all noobs once and even if you
know how to do it it's nice to know where exactly the jack points on
an R32 are. If you've tried reading the Australian service manual to
get that info the pictures are so crappy they might as well be in
braille.
So, let's begin. First step is to
acquire some appropriate material of a pornographical nature - maybe
some DVDs or men's magazines. Then you have to make sure you're
comfortable...wait, what do you mean I'm talking nonsense? I thought
you wanted to know how to jack...OH! You meant you wanted to know how
to jack UP A CAR! Silly me. Very sorry about that.
Anyway, let's talk about the equipment
you need:
- A hydraulic jack – I use a 1.5 ton aluminum low-profile jack I bought from Harbor Freight a long time ago. Lots of people knock Harbor Freight's products but their jacks are actually quite good and I know a lot of trackday regulars who use them. Buy whatever decent brand floats your boat but just make sure it's rated for the vehicle you're lifting. For most regular cars 1.5 tons is plenty. A bigger jack doesn't hurt except it may be harder to get under the car.
- A set of good jack-stands – you'll need one pair for each end of the car you need to lift up. I use aluminum 3-ton stands, again from Harbor Freight, for most cars that have regular jack points on the welded portion of the underside. Normal jackstands have a T-shaped top with a dip in the middle to support the jack point. Some modern cars like the R35 need a stand with a rectangular block on the top to fit into sockets underneath so I also have a set of modified Torin stands for my 2010 GT-R.
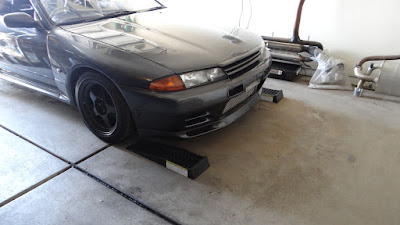
- A set of low-profile ramps – these are a pair of plastic ramps that are only a couple of inches high. With modern performance cars there may not be enough clearance to get a jack underneath so it's good to have a set of these so that you can get the car up just enough to get the jack positioned. On the R32 the lip is low enough that you'll need these for the front. The ones I have I got cheap from Amazon and work well. You can also just drive up on planks but I prefer these ramps because they're more secure.
- A chock or two – you always want to chock a car when lifting it up for safety reasons. If you're lifting the front end it's not a big issue because the parking brake on the rear wheels will keep the car from moving. If you're lifting the rear end though there's no parking brake there so a chock is a definite necessity to help ensure the car doesn't roll off the stands. Whichever end you're lifting chocks are cheap insurance against a life where people confuse you for a flapjack. A rock can work but I have a pair of folding metal ones from, you guessed it, Harbor Freight.
So, lets begin the actual process.
We'll explain jacking up the front first since that's where most work
is done including regular oil changes.
First, you want to drive the car up
onto the low-profile ramps.
 |
| Putting the ramps in position |
 |
| Up on the ramps |
Before I start lifting I usually find
the side jack points already and position the stands next to them so
that I can quickly get them underneath. On the R32, like most cars,
there are six jack points. Two are in the middle for use with
hydraulic jacks while four are on each side for use with the
emergency jack in the trunk, jackstands, or shop lifts. The ones on
the side look like this:
 |
| Notice that slight notch on the pinch weld? That's your jack point. |
Before you lift the car, look
underneath the sides and find these jack points. On the R32 and most
cars the jack points are marked by cutouts on the pinch weld (that's
the seam that you can feel running down the side of the car on the
bottom between the wheels). To lift the front end position the
jackstands on the points behind the front wheel and for the back use
the ones ahead of the back wheels. Always use jackstands in pairs at either the front or back or both - don't use just one jackstand on one corner or the car is unstable. Also, don't use jackstands on any surfaces they can sink into like soil or hot asphalt. Level concrete is best.
Put your chock or chocks in place. For
lifting the front end, put the chock behind the back wheel and for
the back end put it ahead of the front wheel.
Now you want to slide your jack
underneath. There's a crossbeam under the car about where the front
axle lines up and Nissan nicely marked the middle of it with an X so
that you know that's where your jack pad needs to go.
 |
| I'm already doing an oil change here but in this picture you can clearly see the X marking where the front jack point is just to the right of the oil stream. |
Slowly lift up your jack's pad until
you get close to the X-marked jackpoint. Once you're close, make sure
the pad is aligned with the lift point and then jack it up until you
make contact and start lifting the car up off the wheels. How much
you need to extend your jack will vary and that's one more reason to
put the jackstands beside the car already. You don't want the car too
low that you can't get the stands underneath but too high and you
might drop the car hard on the stand and damage the pinch welds or
worse, have the car fall off the stands entirely. I usually extend my
jackstands 2 or 3 clicks up in length and lift the car up just enough
to clear that height.
Once you have the stands underneath,
gently release the pressure in your jack to lower you car until it
rests on the stands. You can then pull out the jack if it will get in
the way of what you're doing or leave in place if not – just be
careful not to trip over it while moving around. And voila, you've
just jacked up your R32!
 |
| Here's what the end result should look like. |
Lifting the back end is essentially the
same process except that you usually don't need to use ramps to get
underneath most cars, the R32 included. Basically you do the same as
on the front except now you need to find a U-shaped bar underneath
the rear end to place your jack pad underneath.
 |
| There's your rear jack point. |
Note that the rear differential is
right there and to old hands that might seem like the expected place
to support the rear of the car but that's not what Nissan tells you
to do. Remember, this isn't your Uncle Joe's rusted-out old Bronco
with the live rear axle and huge pumpkin (that's the rear
differential to you city slickers) hanging out ahead of his
bright-red pair of TruckNutz.
And so, that concludes this DIY. Next
time, we'll talk about...oh, you want to know how to get the car
down? You mean you weren't going to leave it up there to show your
friends your newly-acquired mechanical acumen and also how awesome a
teacher I am?
Pfft. Whatever, you ingrate. Anyway,
the process is simple. Just reverse things. Slip the jack back
underneath and raise the car up off the stands. Take out the stands.
Gently lower the car back down, take out the chocks, and Bob's your
uncle. There, happy?
So as I was saying, that concludes this
DIY-ATNTFIU. Next DIY, we'll make use of this jacking-up knowhow to
complete an essential gearhead rite-of-passage: the oil change.
Important disclaimer: Understand that working on your car can be inherently dangerous. This is meant to be a guide only and does not take the place of common sense and proper safety precautions. Only you can ensure your own safety and that of your vehicle. Know your limits and ask for qualified help if you're unsure of something. Every time you act stupid in the garage...God kills a Miata.
 |
| Do it right and your car will magically get a new set of wheels and tires...or maybe not. |


Comments
Post a Comment