DIY-ATNTFIU: R35 GT-R Cabin Microfilter Replacement
For my first R35 DIY on this blog I
thought I'd post about a simple but necessary procedure that any
owner can do themselves and be able to save a decent amount of money.
This isn't the first R35 DIY guide I've made since I posted this one
a long time ago on the GTRLife forum about swapping the front seats:
Eventually I plan on reposting that DIY
seat guide here too in case anything happens to the original thread.
So, as for the subject of this DIY I'll
be talking about how to swap the cabin microfilter. Nissan recommends
this be done every 12 months or 12,000 miles but the dealerships
charge up to $250 which is outrageous for a simple procedure that
takes maybe 15 minutes to do – less if you've done it already and
follow some of the tips I mention here. The filter itself costs only
about 20 bucks whether you buy the OEM Nissan one or get one from
online so having to pay 200 bucks more to put it in is asinine.
Why do you need to replace the cabin
filter? Well, because after a while it gets plugged up with
pollutants, dust, and evil spirits so if you don't replace it
regularly your nice supercar is going to smell like a teenage boy's
bedroom. If you like that smell then that's cool – I suggest you
proceed to ignore this guide and toss a couple of old copies of
Penthouse under the driver's seat for maximum authenticity.
 |
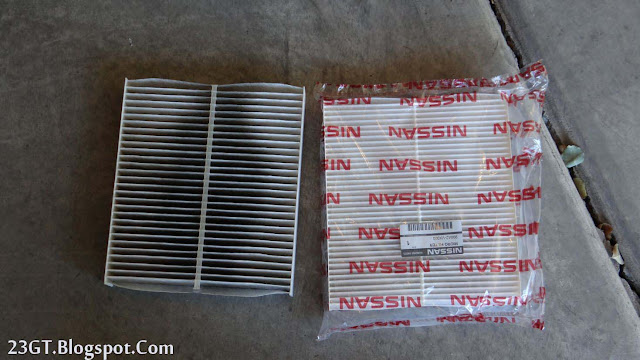
| My old filter versus the new one. Much less eau de dude on the new example. |
So, what do you need to do this?
Nothing much really:
- A Phillips screwdriver
- A flathead screwdriver
- A new cabin filter obviously
- An R35 GT-R to work on
First step is to open your passenger
side door and open the glovebox. I won't bore you with the
complicated steps necessary to do that. If you can't get past this
step feel free to consult your dealer and have 250 bucks handy.
 |
| Dang, that was hard. |
Having accomplished that difficult
first procedure now you need to yank the glovebox out. Yes, I said
yank. It's not screwed in and is just held on by some clips on the
bottom so grab the base of the glovebox and give it a firm tug
straight back and it should pop right out. By the way you may want to
empty the glovebox first of the owner's manual, paperwork, and the
old pigeon's nest that's no doubt in there just to make it easier on
yourself and not make a mess.
After you yank the glovebox off it'll
still be held on by the retractable cord that softens the glovebox
opening so it feels all upscale-like and fancy and not like that
rental Sentra you once got that just kind of fell open with a dull,
cheap thunk. To take it off stick your flathead screwdriver into the
gap just in front of the clip attaching it to the glovebox, twist it
just a smidge, and the clip should pop right off.
 |
| This cord helps make your GT-R feel less like a Sentra. Apologies for the out-of-focus pic. |
What you ultimately want to do is
remove the inner panel behind the glovebox to get to the cabin filter
housing. Before removing that panel, pop off the triangular panel on
the side of the dash. It's just clipped on so grab the the panel and
pull it outwards and it'll come right off.
Now there's an older DIY on GTRLife
that's very helpful but has some extra steps that aren't really
necessary. It mentions removing the doorsill, the passenger side kick
panel, and the panel on the underside of the right side dash. Those
steps aren't needed – the glovebox, inner panel behind the
glovebox, and dash side panel are all that's really necessary. In
fact you could even argue the glovebox doesn't need removing but
we'll talk about that in the next step.
 |
| The inner panel - I've already removed some of the screws on the bottom. |
Once you have the glovebox out of the
way you'll see the inner panel I mentioned. It's held on by five
Philips screws on the bottom, one in the middle, and four on top. The
reason you removed the glovebox is to make it easy to access the two
innermost screws on the bottom but you could conceivably detach the
glovebox clips at the bottom, keep the cord in place, and then use a
really short screwdriver like a ratcheting finger drive to undo the
screws. Some people have had trouble with removing and replacing the
cord so that's one option to save messing with it. I found the cord
easy to deal with though so I recommend just removing the glovebox
entirely like I outline here.
 |
| Some of the top row of screws. They're hard to see at first because of the dash pad. |
After undoing the screws you can now
pop off the panel. Start at the top and just pull the panel off and
it should hang down like in the pic below. It won't come off entirely
because it's still attached by electrical cords but you'll have
enough space to get to the filter housing. Don't be surprised if you
have a lot fewer cords than in my picture – my car has had a couple
of upgrades to the in-car electronics over the years hence the extra
connectors.
 |
| The inner panel is out. Note that the doorsill is removed in this pic but you don't need to do so for this procedure. |
When removing the panels make sure and
pay attention to the little metal clips for the screws. They can
easily fall out and if you lose them your screws won't hold. If they
do fall out just find the tab they go onto and slide them back into
place.
 |
| Don't lose these little buggers or your screws won't hold. |
With the panel down you can see the
white box for the filter off to the center of the dash. Find the tab
on the side of the housing and pull it straight backwards just a
little to unclip it.
 |
| Pull on the tab in the red circle. |
Once it's unclipped, pull the cover
straight out to the side. Don't try to twist it off or you'll break
the two tabs on the inner end holding it in place.
With the cover off the filter is there
for you to just yank out. It's just sitting there and not held in by
anything so don't be shy.
 |
| The new filter goes in that slot, not your old VHS tapes. |
The new filter goes in just by shoving
it in the box. Just pay attention to the airflow arrow on the filter
– it should point downwards since the air flows in from the top and
out the bottom.
 |
| New filter is in. Note the arrow. |
When you try to put the housing's cover
back on it may not want to go in at first. That's because the filter
actually sits in the top half of the box when closed and there are
angled tabs on the back of the cover that keep it raised. If the cover
doesn't want to go back on, lift the filter up a little so it's
sitting at an angle and the tabs can then slide under. Slide the
inner tabs back in, clip the outer locking tab into place, and your
new filter will be nice and snug and happy.
To finish up you just reverse the
steps. Pop the inner panel back on first and redo the screws. After
that push the dash side panel back into place. Before you clip the
glovebox back into place, pull the retracting cord all the way out as
far as it can go. Hold the clip parallel to the side of the glovebox
and push it straight into the hole it was attached to from the side.
It should pop right in. Once the cord is back on just clip the
glovebox back on its hinges. Finally, give yourself a pat on the back
for completing this procedure – or have your girlfriend or wife do
it if you can't reach back there.
So there you have it, you just helped
keep your R35's cabin smelling fresh and new like the day it first
rolled out of the plant in Tochigi and saved 200 bucks while doing so!
Now if you found this guide helpful, please feel free to send the
money you saved via Paypal to yours truly so I can afford to feed my
car habit...and poor children in the third-world...yes, definitely to
feed poor children. Not gonna use the money for anything else, no
sir, not me.
Important
disclaimer: Understand that working on your car can be inherently
dangerous. This is meant to be a guide only and does not take the
place of common sense and proper safety precautions. Only you can
ensure your own safety and that of your car. Know your limits and ask for qualified help
if you're unsure of something. Every time you act stupid in the
garage...God kills a Miata.


Dammit I broke the tabs on the plastic panel cover - they are not very robust so be careful everyone! A new cover is 20 bucks.
ReplyDeleteYeah, those tabs are definitely a pain. I broke the upper one myself so that's why I emphasized not to try and twist it out. Not the best designed piece that's for sure lol.
Delete